
A Beginner's Guide to Installing LED Downlights Safely
Here are the main points to remember when you're ready to install your new LED downlights. Keep these in mind for a smooth and safe job.
Key Takeaways
- Always turn off the power at the main switch before you start any electrical work.
- Gather all your tools beforehand, like screwdrivers, pliers, and a voltage tester.
- Prepare the ceiling area by cleaning it and making sure it's dry.
- Follow the manufacturer's instructions carefully for wiring and fitting.
- Test the lights after installation, and if you're unsure, get a professional to check.
Essential Preparations For Installing LED Downlights
Right then, before you even think about fiddling with wires or drilling holes in your ceiling, we need to get a few things sorted. It’s all about making sure you’re safe and that the job goes as smoothly as possible. Think of this as the pre-flight check for your lighting project.
First things first, you need to make sure the space where you'll be working is ready. This means clearing away any clutter that might get in the way. If you're working in a room, move furniture back a bit, especially if it's directly underneath where the new lights will go. You don't want to be balancing on a wobbly chair with a screwdriver while trying not to knock over a priceless vase, do you?
Clearing the Space
- Remove Obstacles: Get rid of anything that could be a trip hazard or get damaged. This includes rugs, small tables, or anything else that's not bolted down.
- Protect Surfaces: Lay down dust sheets or old newspapers on the floor below your work area. This will catch any dust or debris that might fall from the ceiling.
- Check for Obstructions: Have a quick look in the ceiling space if you can. You don't want to cut into a joist or hit a pipe you didn't know was there. A quick peek can save a lot of hassle later.
Safety First!
This is probably the most important bit. You absolutely must turn off the power to the circuit you'll be working on. Don't just rely on the light switch; go to your fuse box or consumer unit and switch off the relevant breaker. It’s a good idea to put a note on the fuse box so no one accidentally switches it back on while you're up a ladder. A voltage tester is your best friend here; double-check that the power is definitely off before you touch any wires. You can find all the necessary safety gear, like gloves and goggles, at most hardware shops.
Always, always, always confirm the power is off at the source. It might seem obvious, but it's the one step that prevents serious accidents. Don't skip it, no matter how quick you think the job will be.
Having the right tools makes all the difference. Trying to do a job with the wrong equipment is not only frustrating but can also be dangerous. Here’s a list of what you'll likely need:
- Screwdrivers: A set with both Phillips head and flathead bits is a must. You'll need them for removing old fixtures and connecting wires.
- Wire Strippers/Cutters: For preparing the ends of the wires.
- Pliers: Useful for gripping and twisting wires together.
- Voltage Tester: As mentioned, this is non-negotiable for checking if the power is off.
- Tape Measure: To ensure your new downlights are spaced correctly.
- Pencil: For marking cutting lines.
- Utility Knife or Drywall Saw: For cutting the holes in the ceiling.
- Ladder: A sturdy one, obviously!
- Safety Glasses and Gloves: Protect yourself from dust and stray bits of wire.

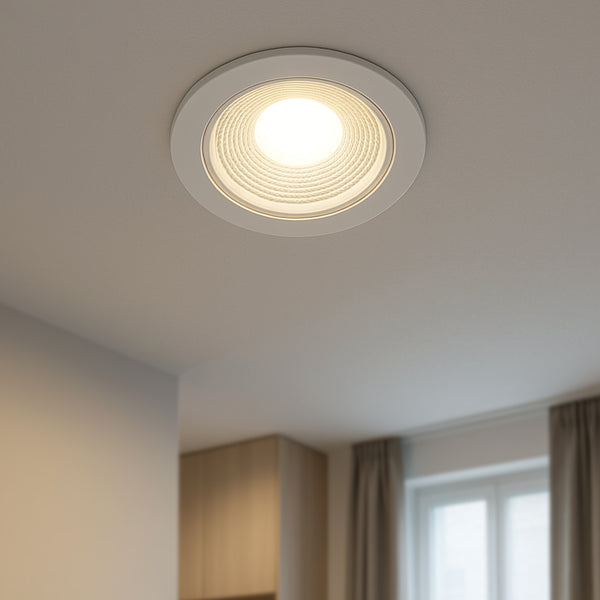
Choosing The Right LED Downlights
So, you've decided to go with LED downlights for your home. Smart move! They're energy-efficient and last ages, which is a win-win. But with so many options out there, picking the right ones can feel a bit overwhelming, especially if you're new to this. Let's break down what you need to think about.
Understanding LED Technology
LEDs (Light Emitting Diodes) are pretty different from the old bulbs we used to have. They don't have filaments that burn out, which is why they last so much longer. They also use way less electricity. When you're looking at LED downlights for beginners, you'll see terms like 'lumens' (which is brightness) and 'Kelvin' (which is colour temperature). Lumens tell you how much light you're getting – more lumens mean a brighter light. Kelvin is about the colour of the light itself. A lower Kelvin number, like 2700K, gives you a warm, cosy yellow light, similar to an old incandescent bulb. Higher numbers, like 4000K or 5000K, give you a cooler, bluer light, which is often better for task areas.
- Lumens: Measures brightness (higher = brighter).
- Kelvin: Measures colour temperature (lower = warmer, higher = cooler).
- CRI (Colour Rendering Index): How accurately the light shows colours (higher is better, aim for 80+).
Don't just pick the brightest or the cheapest. Think about the mood you want to create in each room. A kitchen might need a brighter, cooler light for cooking, while a living room might benefit from a warmer, dimmer glow.
 23% OFF

 11% OFF
Selecting Downlights For Your Needs
When you're choosing your actual downlights, consider a few things. First off, what room is it for? Bathrooms and kitchens need lights that can handle moisture, so look for ones with a good IP rating. For living areas, you might want dimmable options so you can change the atmosphere. Also, think about the size of the room and how many lights you'll need. You don't want it to feel like an operating theatre, but you also don't want dark corners. A good layout plan is key here, and there are some great guides on planning recessed lighting layouts that can help. For a more luxurious feel, you might want to look into downlights with advanced anti-glare features, which can make a big difference to the overall look and feel of a space, especially in high-end residential projects.
Here's a quick rundown:
- Room Type: Consider moisture resistance (bathrooms) and dimmability (living rooms).
- Brightness (Lumens): Match the lumens to the room's function.
- Colour Temperature (Kelvin): Choose warm white for relaxation, cool white for tasks.
- Beam Angle: A wider beam covers more area, a narrower beam is more focused.
- Dimmability: Allows for mood control and energy saving.
Ultimately, the best LED downlights for beginners are those that meet your specific needs for brightness, colour, and functionality in each area of your home.
Safely Installing Your LED Downlights
Right then, let's get down to the nitty-gritty of actually putting these new LED downlights in. This is where things get a bit more hands-on, and safety really is the number one priority. We'll walk through turning off the power, dealing with any old fittings, and making those all-important holes in your ceiling.
Turning Off The Power Supply
If you're replacing old light fittings, you'll need to remove them first. Carefully disconnect the wiring, making a note of how it was connected if you think you might need to refer back to it. Then, detach the old fixture from the ceiling. If it's a simple pendant light, this is usually straightforward. For older, bulkier fittings, you might need a bit more patience. Make sure you have a safe place to put the old fixture and any tools you've used.
Cutting Holes For Downlights
This is where precision is key. You'll need to mark out the exact positions for your new downlights. Often, the packaging for your new LED downlights will come with a template. Use this to draw a circle on the ceiling where the light will sit. It's really important to make sure these holes don't line up with ceiling joists or pipes. You can usually check this by poking around gently with a thin piece of wire or using a stud finder. Getting the placement right now saves a lot of hassle later. For a guide on marking out, check out this recessed lighting installation UK advice.
Once marked, carefully cut along the line. A drywall saw or a sharp utility knife works well for plasterboard ceilings. Go slowly and steadily to get a clean edge. If you're installing fire rated downlights installation, make sure you follow any specific instructions regarding the size and type of hole required, as these often have stricter fitting requirements.
Working with electricity can be dangerous if you're not careful. Always double-check that the power is off at the source before you start any work. If you're ever in doubt about what you're doing, it's always best to call in a qualified electrician. They have the knowledge and tools to do the job safely and correctly, saving you potential headaches and hazards down the line.
This part of the LED downlight installation guide is all about careful preparation. Getting these steps right makes the rest of the process much smoother and, more importantly, much safer. Remember, when installing LED downlights in the UK, always be mindful of local building regulations and electrical safety standards.


Connecting And Testing Your LED Downlights
Right then, you've got your holes cut and your new downlights are ready to go in. This is where things get a bit more hands-on, connecting the wires and then, the moment of truth – testing them out. It’s not overly complicated, but you do need to be careful.
Wiring The LED Downlights
Before you do anything, double-check that the power is definitely off at the breaker. Seriously, don't skip this. You'll typically have three wires coming from your new LED downlight: a live (often brown or black), a neutral (usually blue or white), and an earth (green and yellow or bare copper). Your existing wiring in the ceiling will have corresponding wires. The general rule is to connect like for like: live to live, neutral to neutral, and earth to earth. If you're unsure about the colours, it's always best to check with a qualified electrician or consult the manufacturer's guide. For a standard setup, you'll connect the wires using the provided connectors or Wago clips. Make sure all connections are secure and insulated.
Connecting To The Power Supply
Once the individual downlights are wired up, you'll connect them to the main power circuit. This usually involves linking the wires from each downlight together and then connecting them to the appropriate wires from your home's electrical system. Again, power off is non-negotiable here. If you're replacing an old light fitting, you'll likely be connecting to the existing junction box or wiring. If it's a new circuit, you'll need to follow the specific instructions for that, which might involve connecting to a lighting circuit at your consumer unit. It's a good idea to have a look at how light fixtures are typically wired to get a general idea.
Testing The Illumination
With all the wiring done and double-checked, it's time to see your handiwork in action. Go back to your consumer unit and switch the power back on for that circuit. Flick the light switch. Hopefully, you'll be greeted by a nice, even glow from your new downlights. Check each one to make sure it's working as expected. Look at the brightness and the colour. Does it feel right for the room? Sometimes, you might notice a slight flicker or one light not coming on. If that happens, switch the power off again immediately and re-check your connections. It's often just a loose wire or a faulty connection. If you've got a lot of downlights, you might want to test them in stages, especially if you're not used to this sort of work. It's always better to be safe than sorry when dealing with electricity, and if you're at all unsure, getting professional installation advice is a wise move.
Remember, electrical work can be dangerous if not done correctly. Always prioritise safety and if you have any doubts whatsoever, stop and call a qualified electrician. It's not worth the risk.
Important Safety Considerations
Right then, we've covered getting the lights in and wired up, but before you flick that switch, let's have a quick chat about staying safe. It might seem obvious, but a few things are worth double-checking.
Understanding Heat Generation
LEDs are much better than old-fashioned bulbs when it comes to heat, but they still produce some. It's not usually enough to burn you instantly, but it's something to be aware of, especially if you're fitting them into a confined space like a ceiling void. You don't want them getting too hot, as it can shorten their lifespan or, in rare cases, cause issues. Make sure there's a bit of airflow around them if the instructions suggest it. It's a good idea to check the manufacturer's specs on operating temperatures, which you can often find on their website or the product packaging.
Frequently Asked Questions
Do I really need to turn off the power?+
Yes, absolutely! It's super important to switch off the power at your home's main breaker box before you touch any wires or fixtures. This stops you from getting an electric shock, which can be really dangerous.
What tools will I need to install LED downlights?+
You'll want a few basic things. A screwdriver set (both flat and crosshead), some pliers for gripping and twisting wires, and a wire cutter are handy. A voltage tester is also a must-have to double-check that the power is truly off.
Can I put LED downlights in any ceiling?+
Generally, yes, but you need to check. Make sure the ceiling material is suitable and that there's enough space above for the light fitting and any wiring. Some older or weaker ceilings might need extra support.
How do I know if I've wired them correctly?+
This is where following the instructions that come with your lights is key. Usually, there are colour-coded wires (like brown for live, blue for neutral, and green for earth) that need to be connected to the corresponding wires in your ceiling. If you're not confident, get an electrician to look.
Will LED downlights get hot?+
LEDs produce much less heat than old-fashioned bulbs, which is one of their big advantages. However, the fittings themselves can still get warm, especially if they're in a confined space. Just be careful not to touch them right after they've been on for a while.
What if my new lights don't work after I install them?+
Don't panic! First, double-check that the power is on at the breaker. Then, carefully re-check all your wiring connections to make sure they are secure. If it's still not working, it might be a faulty light or a more complex wiring issue, and it's probably time to call a professional.
Labels:
Vorig
What Size Chandelier Do You Need? A Room-by-Room Guide
Volgende
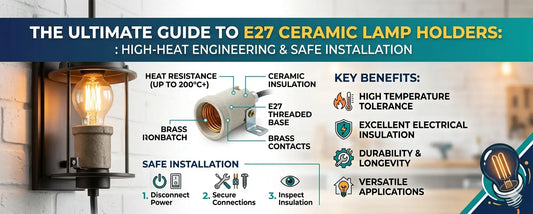
The E27 Lamp Holder Material Guide: Ceramic vs Bakelite Sockets
Gerelateerde artikelen

Light Solutions for Windowless Rooms
Jun 04 2026