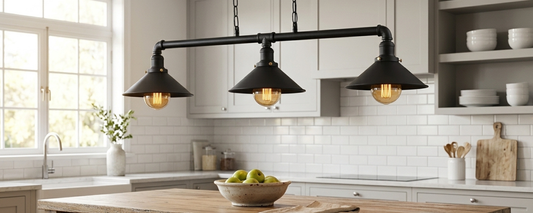
Multi-Outlet Ceiling Roses Explained: How to Wire Multiple Pendants Safely
Key Takeaways
- A standard single ceiling rose is only designed to carry one flex — under BS, you need a rose that's specifically built for more than one pendant before you hang a second or third light from it.
- Multi-outlet ceiling roses come in 2-way, 3-way, 5-way and bespoke cluster formats, each with separate cable entries and strain-relief points for every flex.
- The wiring logic is the same "loop-in" method used for a single pendant — you're simply repeating the neutral, live and earth connections for each additional flex, not inventing a new circuit.
- Weight matters as much as wiring: multi-pendant clusters need a joist-fixed bracket or plate, not just the rose's own screws into plasterboard.
- Anything beyond a straightforward like-for-like fitting swap in England and Wales should be treated as notifiable work under Part P — this guide is educational, not a substitute for a qualified/NICEIC-registered electrician.
Introduction
Cluster pendants over a kitchen island. Three bare-bulb drops staggered above a dining table. A row of industrial pipe lights running the length of a hallway. Almost every "statement lighting" look currently trending on Pinterest and in UK interior magazines relies on one unglamorous component: the ceiling rose that all those cables actually connect to.
The trouble is, most homes in the UK were built with a single-outlet ceiling rose — a small plastic or metal disc designed to take exactly one flex. Try to squeeze a second or third pendant into it and you're not just risking an untidy finish, you're working outside the manufacturer's design and outside UK wiring regulations.
This guide explains what a multi-outlet ceiling rose actually is, how the wiring differs from a standard single-pendant install, what the regulations say, and where the line sits between a job you can safely DIY and one that needs a qualified electrician.
What Is a Multi-Outlet Ceiling Rose?
A multi-outlet ceiling rose is a ceiling-mounted electrical accessory with two or more dedicated cable entry points, each with its own strain-relief hook or grommet, allowing several pendant flexes to be connected to a single supply point safely and neatly. Unlike a single-outlet rose, every outlet on a multi-outlet version is engineered to take the mechanical load and electrical connection of an independent flex — so the fitting doesn't rely on one overloaded terminal block or a single strain-relief hook doing the work of three.
You'll typically see them described as:
- 2-way / twin ceiling roses — for a symmetrical pair of pendants, common over dining tables and beds.
- 3-way ceiling roses — the most popular format for kitchen islands and breakfast bars.
- 5-way or multi-drop cluster roses — used for statement clusters at varying drop heights, often in stairwells, hallways or double-height living spaces.
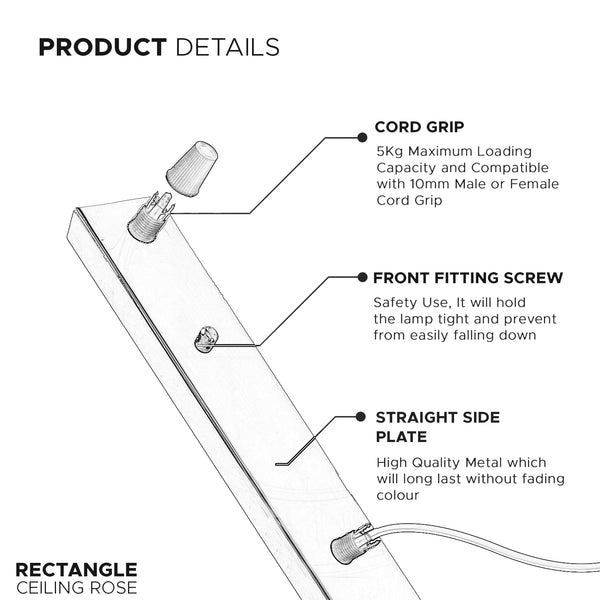
- Bespoke plate or track-style outlets — a flat ceiling plate drilled with multiple holes, popular in industrial and Scandi-industrial interiors, often paired with fabric flex and exposed lamp holders.


Single-Outlet vs Multi-Outlet: What the Regulations Actually Say
This is the part most blog posts on this topic skip — and it's the single most important thing to understand before you buy anything.
a ceiling rose that is not specifically designed for multiple pendants must only supply one flex. This isn't a grey area or a "best practice" suggestion — it's a compliance requirement. The reasoning is straightforward: a standard rose's terminals, cable entry hole and strain-relief hook are sized and rated for one flex's current and one flex's weight. Feed a second flex through the same terminals and you introduce:
- Terminal overcrowding — too many conductors crammed into a terminal designed for fewer, increasing the risk of a poor connection, arcing or overheating.
- No individual strain relief — if the rose only has one anchor point for the flex, the second and third cables have nothing to stop them pulling on their terminal connections, which can loosen live conductors over time.
- Uncontrolled weight loading — plasterboard ceiling fixings are only rated for what the rose was designed to carry.
The fix isn't complicated: buy a rose that's built for the number of pendants you want. Manufacturers rate multi-outlet roses for a specific number of flexes and, in the better ones, a maximum combined weight — treat both numbers as hard limits, not guidelines.
Tools and Materials You'll Need
- Voltage tester / two-pole tester (non-contact testers alone are not sufficient for safe isolation)
- Screwdrivers (flat and cross-head), wire strippers, side cutters
- The multi-outlet ceiling rose itself, rated for your number of pendants
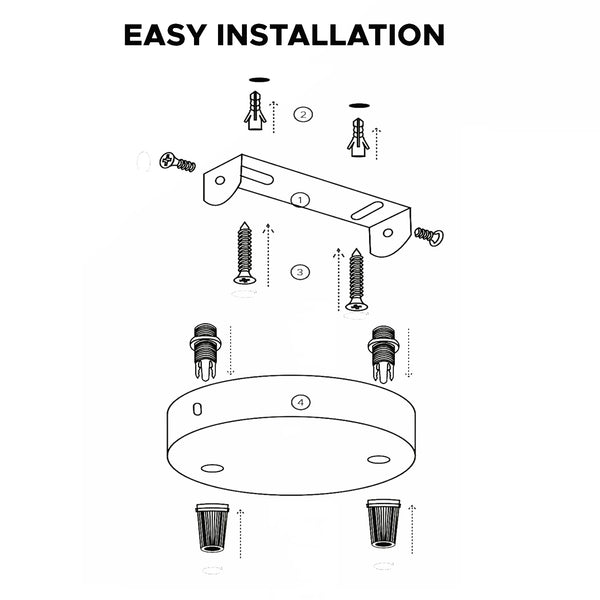
- A ceiling rose bracket or pattress box if you're not fixing directly into a joist
- Round or twin-and-earth cable as required for any new runs
- Connector blocks or push-fit connectors (where the rose doesn't have enough built-in terminal capacity)
- Cable clips, a junior hacksaw or bradawl, and a torch/head-torch for loft or void access
- PPE: safety glasses and, if working in a loft, knee protection and a proper loft ladder
How Multi-Outlet Wiring Actually Works
If you already understand how a single ceiling rose is wired using the loop-in method, multi-outlet wiring isn't a new skill — it's the same three-terminal logic (live, neutral, earth) repeated for each additional flex, using the rose's extra outlets instead of overloading one set of terminals.
A typical single-pendant loop-in rose has:
- A neutral loop-in terminal joining the incoming and outgoing circuit neutrals plus the pendant flex neutral
- A live loop-in terminal joining the incoming and outgoing circuit lives plus the switch wire
- A switch-live terminal feeding the switched live to the pendant flex
- An earth terminal joining all circuit earths and the flex earth (sleeved in green/yellow where bare)
On a genuine multi-outlet rose, each additional flex gets its own dedicated live, neutral and earth connection point — not a second wire jammed into the same screw terminal as the first. This is the detail worth checking before you buy: a cheap "multi" rose that's really just a single-outlet rose with extra holes drilled in the cover is not the same product, and doesn't solve the regulatory issue above.
Step-by-Step: Wiring a Multi-Outlet Ceiling Rose
Always isolate the circuit at the consumer unit and prove it's dead with an approved voltage tester before touching any wiring.
- Isolate and test. Switch off the relevant circuit at the consumer unit, lock off if possible, and test the cables at the existing rose are dead using a proper two-pole voltage tester — not just a non-contact pen.
- Remove the old rose and check the fixing point. If you're replacing a single rose with a multi-outlet version, confirm there's a joist, noggin or ceiling rose bracket behind the fixing point capable of taking the extra weight — see the next section.
- Identify the incoming supply. Note which cables are the permanent live/neutral/earth loop-in, and which core is the switched live from the light switch.
- Connect the loop-in conductors. Join the incoming and outgoing circuit neutrals to the neutral terminal bank, the lives to the live terminal bank, and all earths (sleeved green/yellow) to the earth terminal bank, exactly as you would on a single rose.
- Connect the switch-live to each outlet. Feed the switched live to each of the rose's individual outlets — on most multi-outlet roses these outlets are bridged internally or via a small link wire, so every pendant switches together, but check your specific product's instructions as some allow independent switching.
- Wire each flex into its own outlet. Strip and connect each pendant's live, neutral and earth into its dedicated terminal set, then seat the flex firmly into its individual strain-relief hook or grommet — never share one hook between two flexes.
- Dress the cables and fit the cover. Tuck conductors neatly so nothing is trapped or under tension, then fit the rose cover and confirm it seats flush with no pinched wires.
- Restore power and test. Turn the circuit back on and test each pendant individually, and together with the switch, before fitting bulbs and shades permanently.

If, at any point, the incoming wiring doesn't match a standard loop-in layout—for example, older radial lighting circuits, junction-box wired systems, or anything with unfamiliar core colors—stop and bring in a qualified electrician rather than guessing.
Weight and Fixing: The Part Everyone Forgets
Wiring correctly is only half the job. A multi-outlet rose carrying three or five glass or metal pendants can weigh considerably more than the plasterboard skim and a couple of self-tapping screws were ever designed to hold.
- Always fix into a joist where possible, or use a noggin (a short timber cross-brace) fitted between joists if the rose doesn't land on one.
- Where joists aren't accessible or conveniently placed, use a dedicated ceiling rose bracket or mounting plate rated for the combined weight of your pendants, fixed with appropriate cavity or timber fixings.
- Check the manufacturer's maximum load rating for the specific multi-outlet rose and treat it as a hard ceiling (pun intended) — don't assume heavier fittings will simply "be fine" because the rose looks sturdy.
- For very heavy clusters (large glass pendants, multiple chandeliers-style drops), consider a supporting hook fixed independently into the joist, taking the mechanical weight off the electrical terminals entirely, with the rose only carrying the electrical connection.
Common Mistakes to Avoid
- Buying a single-outlet rose and drilling extra cable entry holes yourself. This does not create additional, independently-rated terminals or strain relief — it just creates a non-compliant, unsafe fitting.
- Sharing one strain-relief hook between two or three flexes. Over time this puts tension directly on the electrical terminals as the flexes settle and shift.
- Ignoring the weight rating and hanging heavy glass or metal pendants from a rose only tested for lightweight fittings.
- Mixing old and new cable colours without checking. Pre-2004 UK wiring used red for live and black for neutral; post-2004 uses brown for live and blue for neutral. Never assume — trace and test.
- Skipping isolation because "it's just a light fitting." Ceiling rose work is still live electrical work on the mains supply until you've proven it dead.
- Not checking whether the work is notifiable. New circuits, and some rewiring work in kitchens and outdoor areas, fall under Part P of the Building Regulations in England and Wales and may need to be certified by a registered electrician or signed off by Building Control.
When to DIY and When to Call an Electrician
A confident, competent DIYer replacing a like-for-like single pendant on an existing circuit is generally on safe, familiar ground. Multi-outlet installs sit in a different risk category, and we'd recommend a qualified electrician if any of the following apply:
- You're adding a new lighting point or extending a circuit, rather than replacing an existing rose
- The existing wiring doesn't match a standard loop-in layout, or uses old cable colours
- The pendant cluster is heavy, or the ceiling construction is unclear (solid vs suspended, joist location unknown)
- The work is in a kitchen outdoor area, where Part P notification requirements are stricter
- You're not fully confident isolating, testing and proving a circuit dead before you start
Choosing the Right Multi-Outlet Ceiling Rose
Once you've settled the safety and structural side, the design decision is genuinely one of the more fun parts of a lighting project:
- Match outlet count to layout, not ambition. A 3-way rose over a 1.8m island generally reads better than a 5-way rose crammed into the same space — spacing matters more than pendant count.
- Check maximum flex/cable diameter. Fabric-braided cable (popular for industrial and vintage looks) is thicker than standard round cable — make sure the rose's cable entries and grips accommodate it.
- Finish it to match your pendant hardware, not just your ceiling colour — black, brushed brass, antique brass and matte white are the most requested finishes in 2026 industrial and warm-minimalist schemes.
- Buy the bracket at the same time as the rose if you know you're fixing between joists — it saves a second delivery wait mid-project.
- Pair with the right connectors. Where a rose's built-in terminal capacity is tight for three or more flexes, quality push-fit or screw connector blocks make for a far more reliable joint than twisted, taped conductors.
Multi-Outlet Ceiling Rose vs Other Ways to Wire Multiple Pendants
A multi-outlet rose isn't the only route to a cluster-pendant look, and it's worth knowing the alternatives so you pick the right one for your ceiling, budget and skill level.
- Junction box + separate hooks. Instead of one rose carrying both the wiring and the weight, a junction box handles the electrical joint while each pendant hangs from its own ceiling hook fixed independently into a joist. This spreads the mechanical load away from the electrics entirely, which is often the safer option for very heavy glass or metal pendants, but it means more visible fixing points and a less streamlined finish than a single rose plate.
- Chandelier bars and ceiling tracks. A surface-mounted bar or track lets you position pendants along its length rather than fixing them to specific pre-drilled holes. This is useful over long runs — a kitchen island or dining table — but the bar itself still needs a compliant wiring connection at its supply end, so you're not skipping the regulatory requirement, just relocating it.
- Multiple single-outlet roses on one circuit. Rather than one multi-outlet fitting, you install two or three individual single-outlet roses, each correctly wired for its one pendant, connected via looped cable across the ceiling void. This is fully compliant and often cheaper per-fitting, but means more ceiling penetrations, more cable runs, and a less unified look directly above the light cluster.
For most cluster-pendant projects over an island, table or stairwell, a genuine multi-outlet rose remains the neatest and most cost-effective option — it's a single fixing point, a single certificate-worthy connection, and the cleanest finish on the ceiling. Reach for a junction-box-and-hooks approach when pendant weight is the dominant concern, and consider multiple single roses when you want more flexibility over exact drop positions than a fixed multi-outlet plate allows.
What Does a Multi-Outlet Ceiling Rose Cost?
Budget for the fitting itself, the bracket, and (if needed) the electrician's time as three separate line items rather than one figure. A basic 2-way or 3-way multi-outlet rose typically sits at a modest premium over an equivalent single-outlet rose, reflecting the extra terminals and strain-relief hardware rather than any exotic materials. Decorative finishes — brushed brass, antique bronze, ceramic — cost more than plain white or black, as does anything rated for heavier fabric-braided flex. If you're bringing in an electrician for anything beyond a like-for-like swap, get that quoted separately: a short call-out for testing, connecting and certifying a multi-outlet rose is usually far cheaper than most homeowners expect, and it buys you a Minor Works Certificate that a DIY install never can.
Frequently Asked Questions
Can I wire two pendant lights to one ceiling rose?+
Only if the ceiling rose is specifically designed and rated to support more than one flex. A standard single-outlet ceiling rose should only supply one pendant. For two or more pendants, use a multi-outlet ceiling rose with separate terminals and strain relief for each flex.
Is it legal to install a multi-outlet ceiling rose myself in the UK?+
A straightforward replacement of an existing ceiling rose is generally suitable for competent DIY installation. However, adding new lighting points, extending electrical circuits, or working in kitchens,or outdoor areas may fall under Part P of the UK Building Regulations and should be carried out or certified by a qualified electrician.
How many pendants can I hang from one ceiling rose?+
The number of pendants depends on the ceiling rose's design and load rating. Multi-outlet ceiling roses are commonly available with 2, 3, or 5 outlets, each with specified maximum weight limits per outlet and overall. Always follow the manufacturer's recommended capacity.
Do all the pendants on a multi-outlet rose switch on together?+
Yes. Most standard multi-outlet ceiling roses connect all pendants to the same switched live, so they operate together from a single wall switch. Independent control requires a specially designed ceiling rose or separate switched electrical circuits.
What's the difference between a ceiling rose and a junction box for multiple lights?+
A ceiling rose provides both the electrical connection and mechanical support for hanging a light fitting. A junction box only joins electrical wiring and is not designed to support the weight of pendant lights, which require their own secure mounting point.
Bringing It All Together
A multi-outlet ceiling rose is a small, inexpensive component that makes a genuinely large visual difference — but it's also one of the few "just a light fitting" jobs where getting the specification wrong has real safety consequences, not just a slightly wonky finish. Buy a rose that's actually rated for the number of pendants you want, respect its weight limit, fix it properly into the ceiling structure, and wire each flex into its own dedicated terminal and strain relief rather than doubling up on a single-outlet fitting.
If your project involves anything beyond a like-for-like swap — new circuits, older wiring, heavy clusters, or kitchen locations — bring in a qualified, registered electrician to carry out or sign off the work. Get the fundamentals right and a multi-outlet ceiling rose is one of the easiest ways to turn a single bare bulb into the kind of layered, cluster-pendant lighting moment that used to need a full rewire to achieve.
Labels:
Vorig
Single Pendant vs Cluster: Which Is Right for Your Kitchen Island in 2026?
Volgende
Ceiling Rose Brackets UK: The Complete Guide to Strap Fixing Light Plates
Gerelateerde artikelen


What Colour Lampshade Makes a Room Look Bigger?
Aug 10 2026